Button
Introduction
The Button Field is an interactive type of Field in AITable. It appears as a clickable button, enabling users to trigger specific operations, such as opening a designated webpage or initiating an automated workflow with a simple click.

Examples
CRM
Scenario: In a form that manages customer information, it is often necessary to perform several operations that interact with customers, such as sending emails, scheduling meetings, etc.
Application: Set different buttons next to each customer record, such as "Send Email" button can be linked to an email template to automatically fill in the customer's email address; "Schedule Meeting" button can be linked to a calendar to help quickly set up a meeting with the customer.
Project management
Scenario: In project management, it is often necessary to update the status of tasks, record completion, etc.
Application: In the project tracking form, set a "Update Status" button for each task. After clicking it, you can directly mark all the related subtasks of the task as complete, or open a small window to record the detailed progress.
Resource scheduling and management
Scenario: In resource scheduling forms, there is often a need to quickly allocate resources, such as conference room booking and equipment allocation.
Application: Set up a button next to the resource list, such as "Reserve Conference Room", after clicking it, you can directly fill in the reservation information and send it to the relevant management personnel to realize rapid response and processing.
Marketing campaign tracking
Scenario: When tracking the effectiveness of a marketing campaign, you need to quickly access the campaign page, update campaign data, and so on.
Application: In the campaign list, set up a "View Campaign" button for each marketing campaign, which can directly jump to the campaign's web page after clicking; and set up an "Update Data" button to facilitate quick entry or modification of campaign-related data.
Financial reporting and auditing
Scenario: When dealing with financial reporting, there is often a need to update reports or generate audit logs based on the latest data.
Application: Set the "Generate Report" button in the financial form and click it to generate the corresponding financial report based on the current data; set the "Start Audit" button to quickly start the audit process and record the key information in the audit process.
Through these examples of practical application scenarios, you can see the great potential of button fields to enhance work efficiency and simplify operational processes.
In the above example, the button only acts as a "trigger for an action", to realize the closed loop of business requirements, you still need to work with automation or third-party APIs to form a complete solution.
Configuration Instructions
A "Button" is a field type that can be created in any table. The following is an example of a new button field and explains the configuration items involved.
Creating a "Button" Field
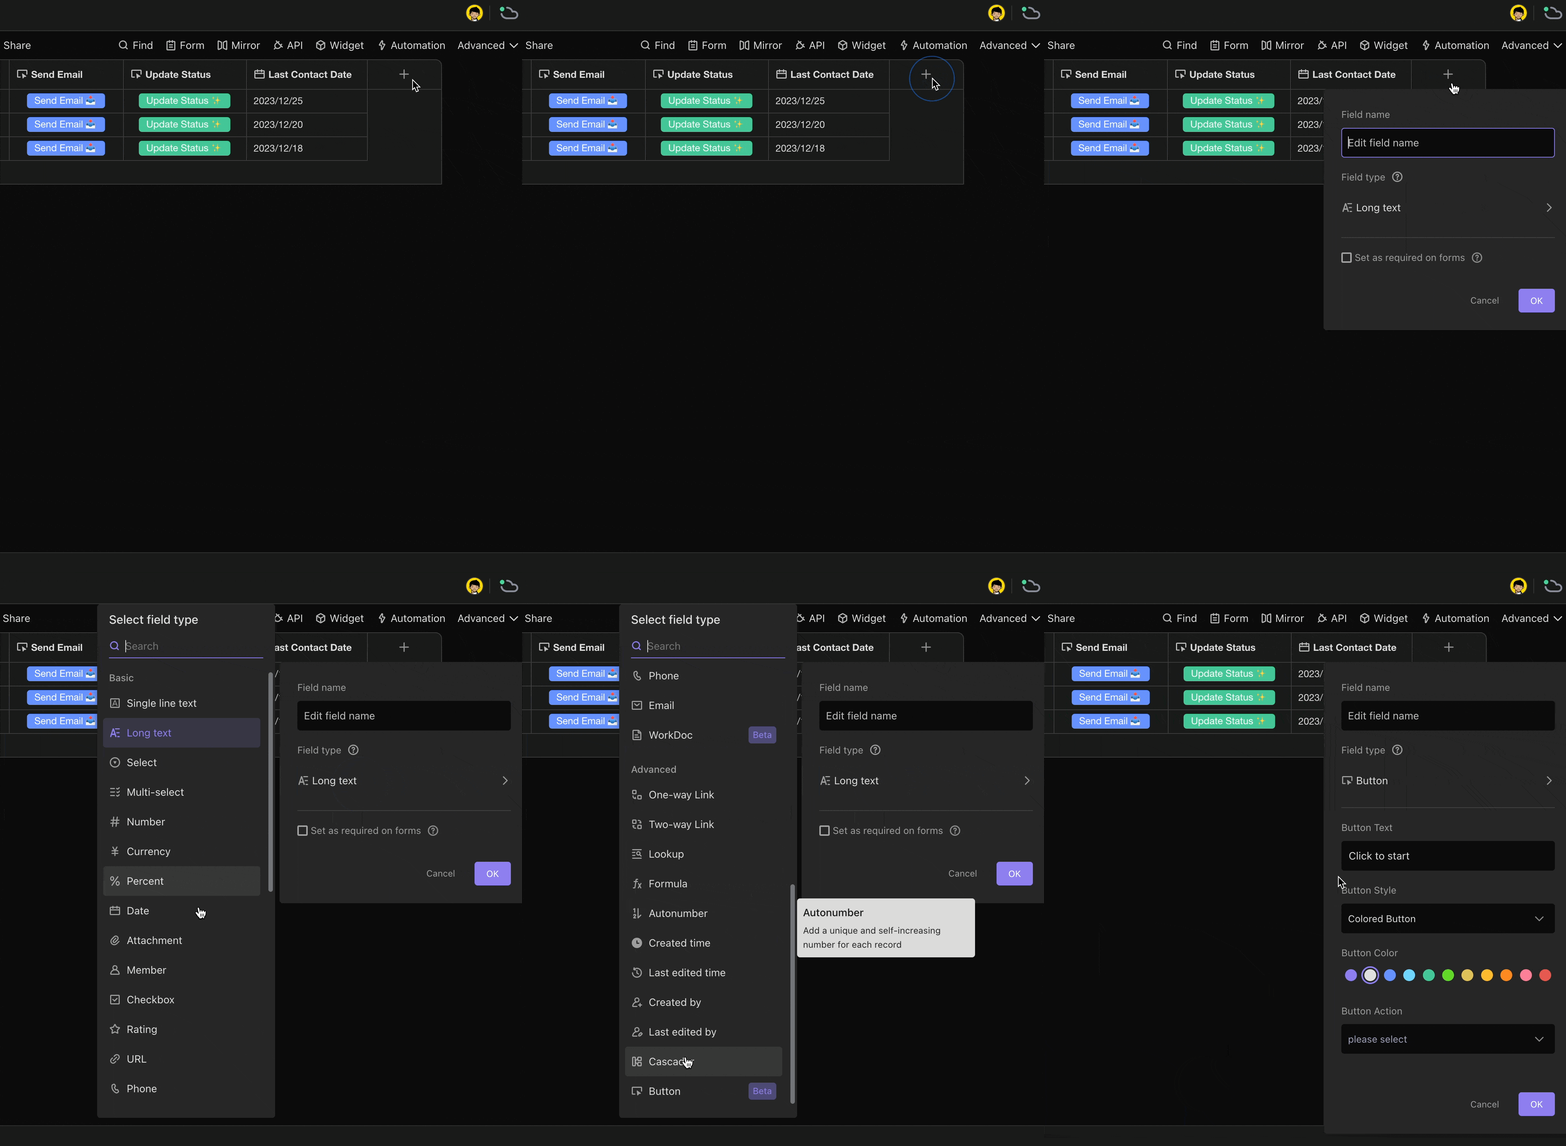
As shown in the picture below, click the "+" sign to add a new column, and select the "Field Type" as "Button".
Modify the Text on the button
The text on the button defaults to "Click to start". You can modify it according to business scenarios, such as "Fill in the form", "Send email", "Update order status", etc.
Changing the style of a button
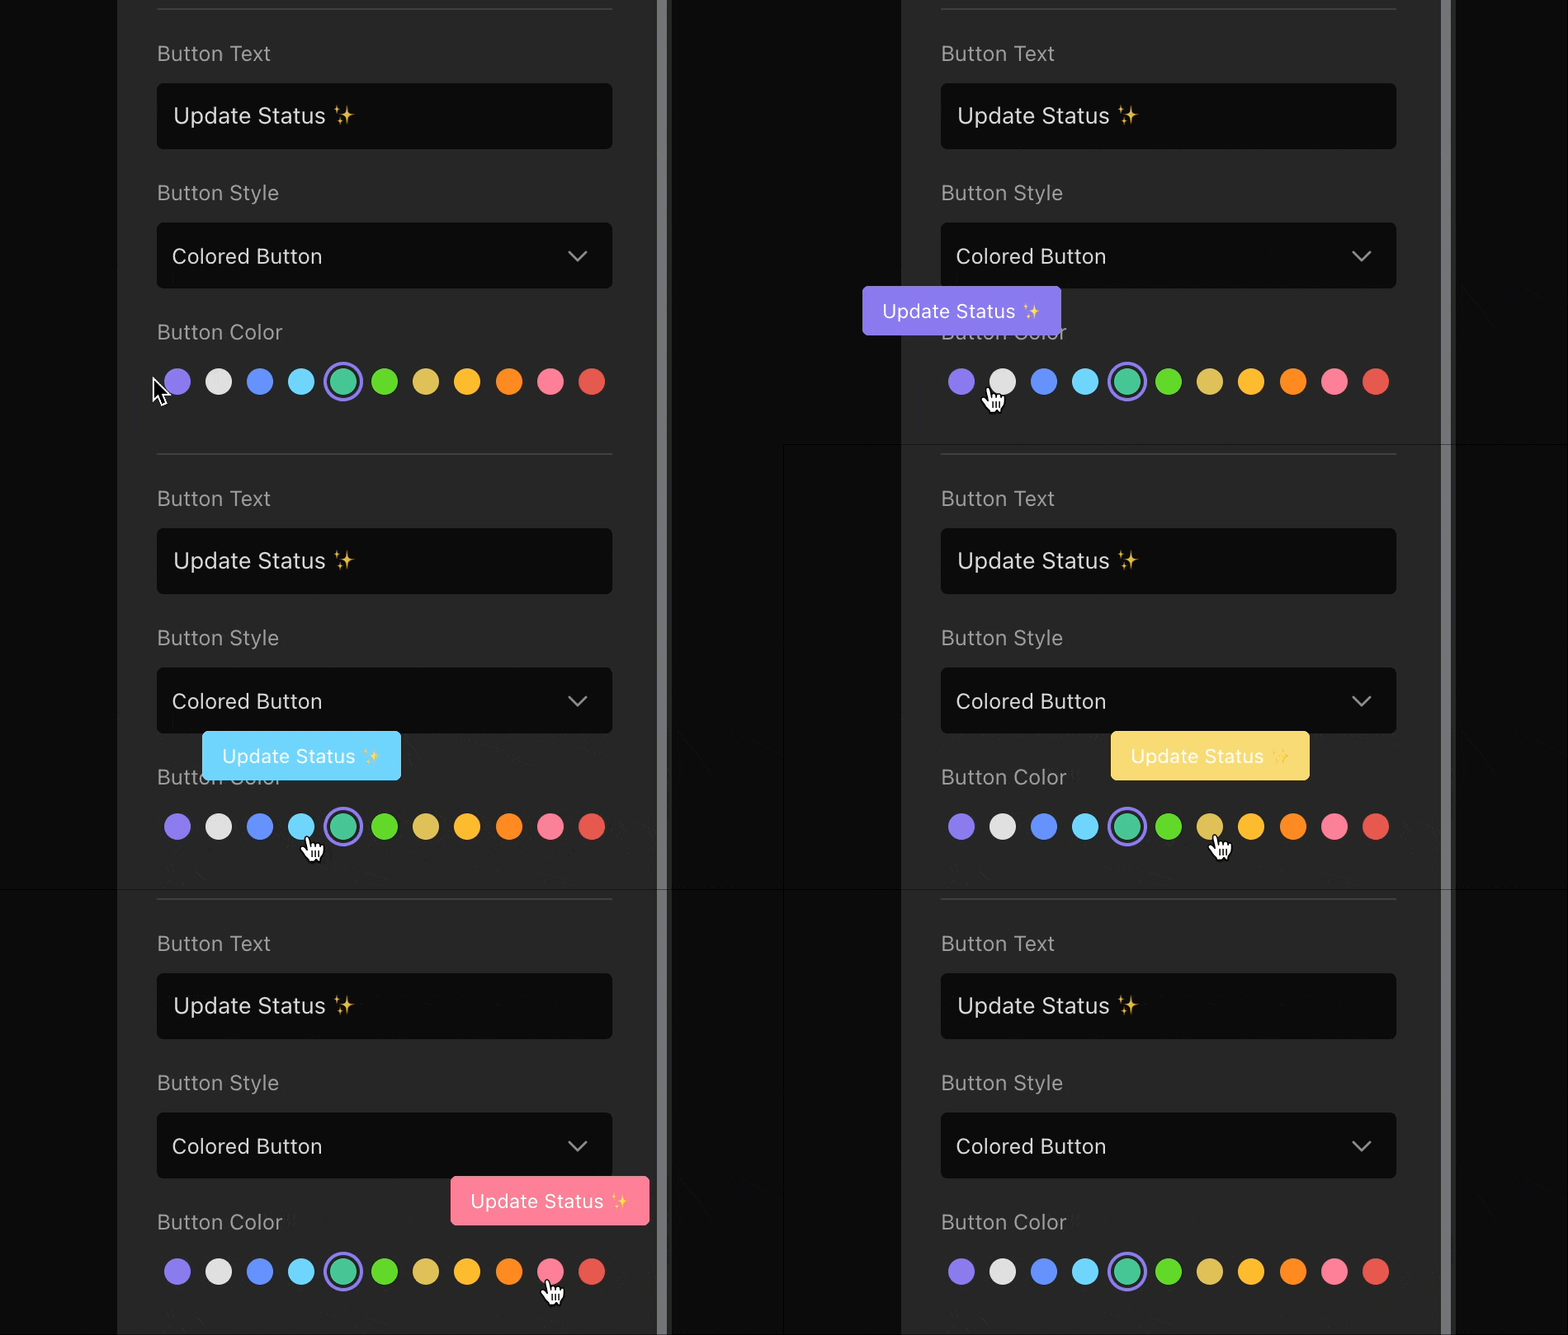
The default style for buttons is button background coloring, and there are 11 colors to choose from:
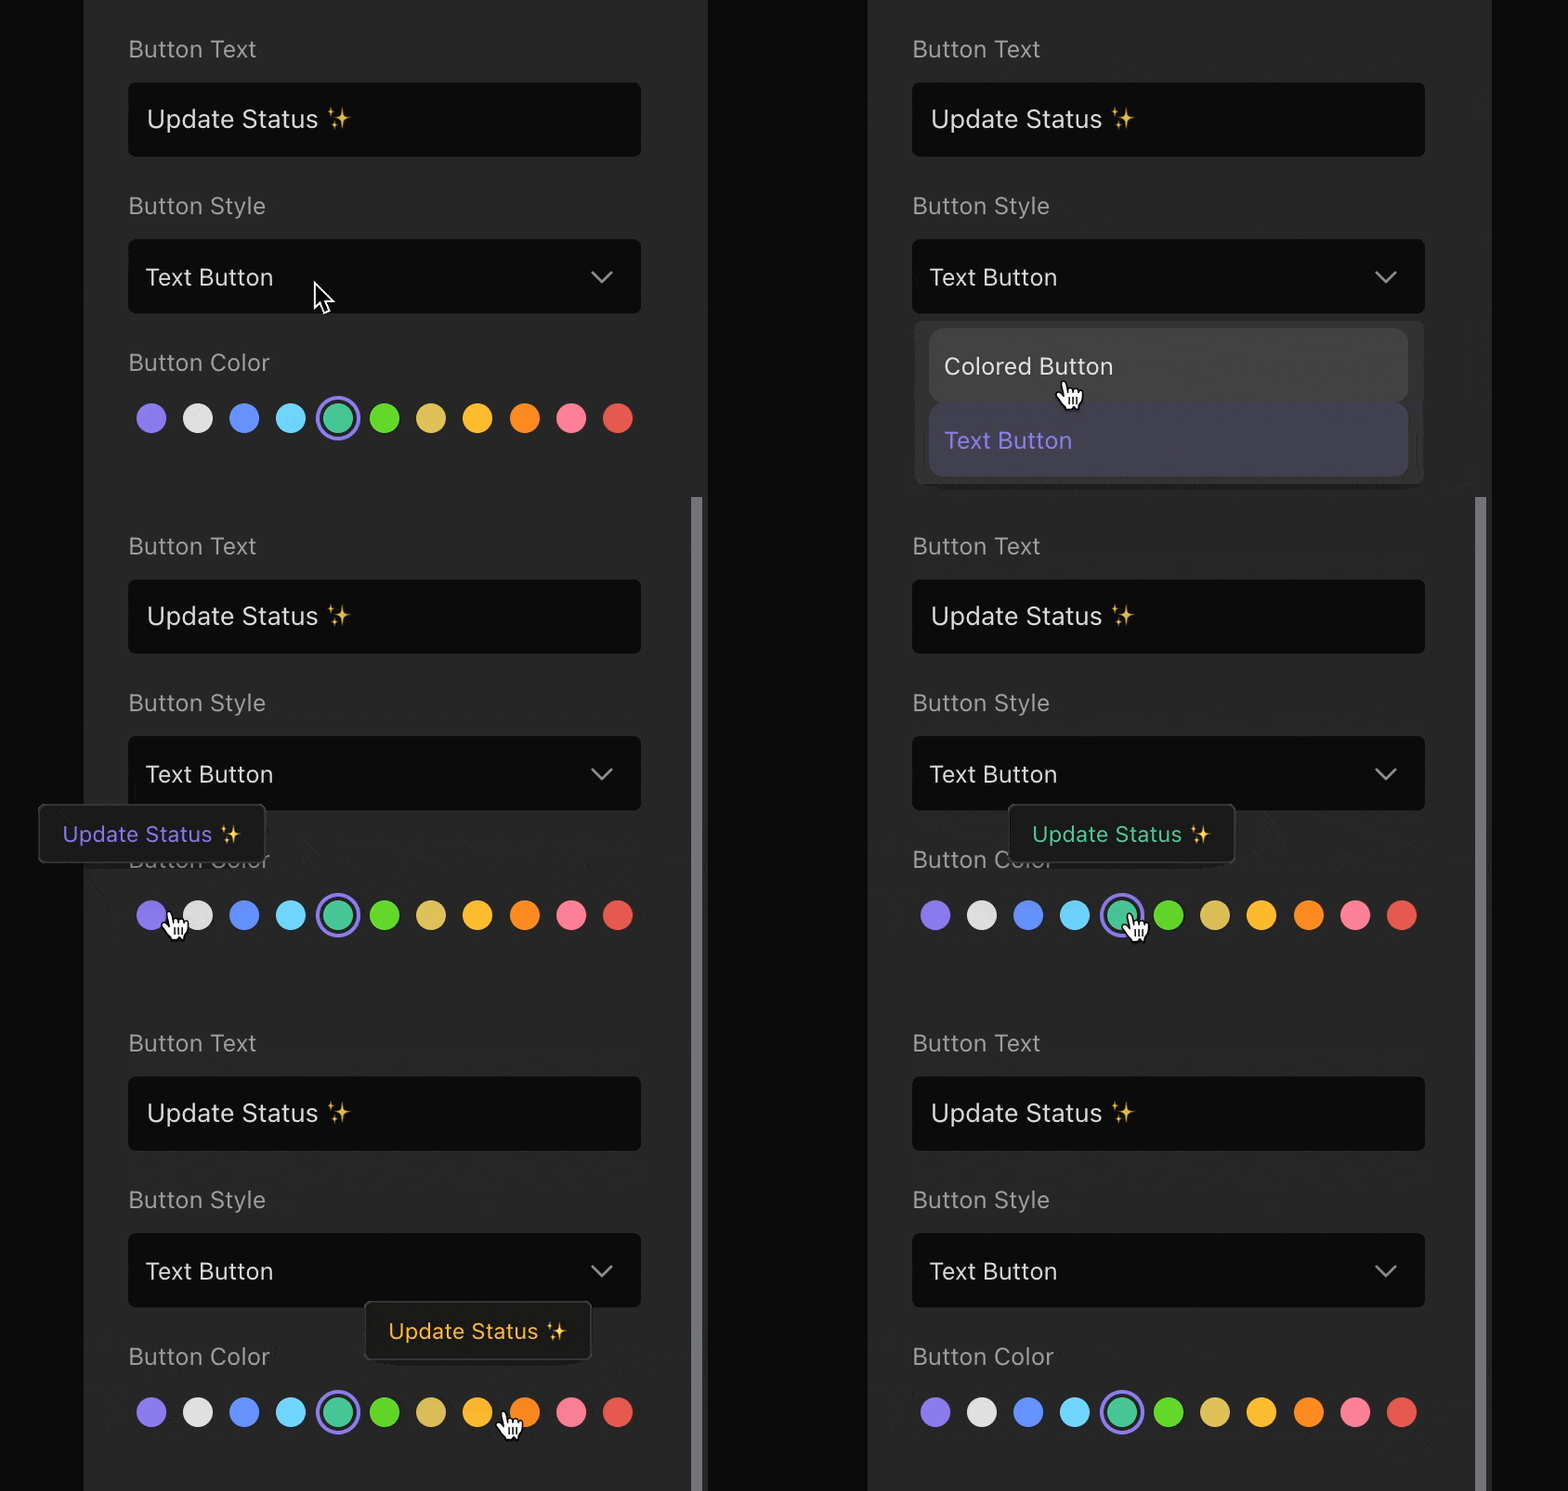
Toggle the style to "Text Button" to change to text coloring:
Setting the action to be performed when a button is clicked
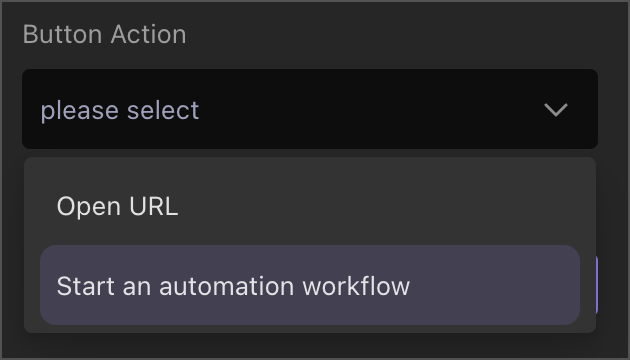
This configuration is the crux of the Button Field, determining the action triggered upon clicking. Currently, the Button Field supports the execution of two types of actions: Open URL and Start an automation workflow
Open URL: Direct Website Access with a Click
This operation allows for immediate access to a specified webpage upon clicking the button. For instance, you can configure the button to open
https://aitable.aiin a new tab when clicked.Additionally, the URL input supports switching to a formula mode, enabling the incorporation of data from other fields to construct the link. For example, you could set up a button action to redirect to
"https://aitable.ai?name="+{{Name}}+"&email="+{{Email}}. This way, clicking the button would open a new tab tohttps://aitable.ai?name=Bob&email=bob@aitable.ai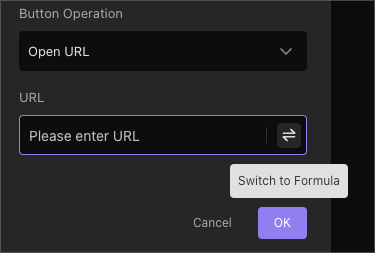
Start an automation workflow
When opting to start an automation workflow, first select an automation node. You can either choose an existing node in the configuration or click "Add a new automation node" to add a new node.
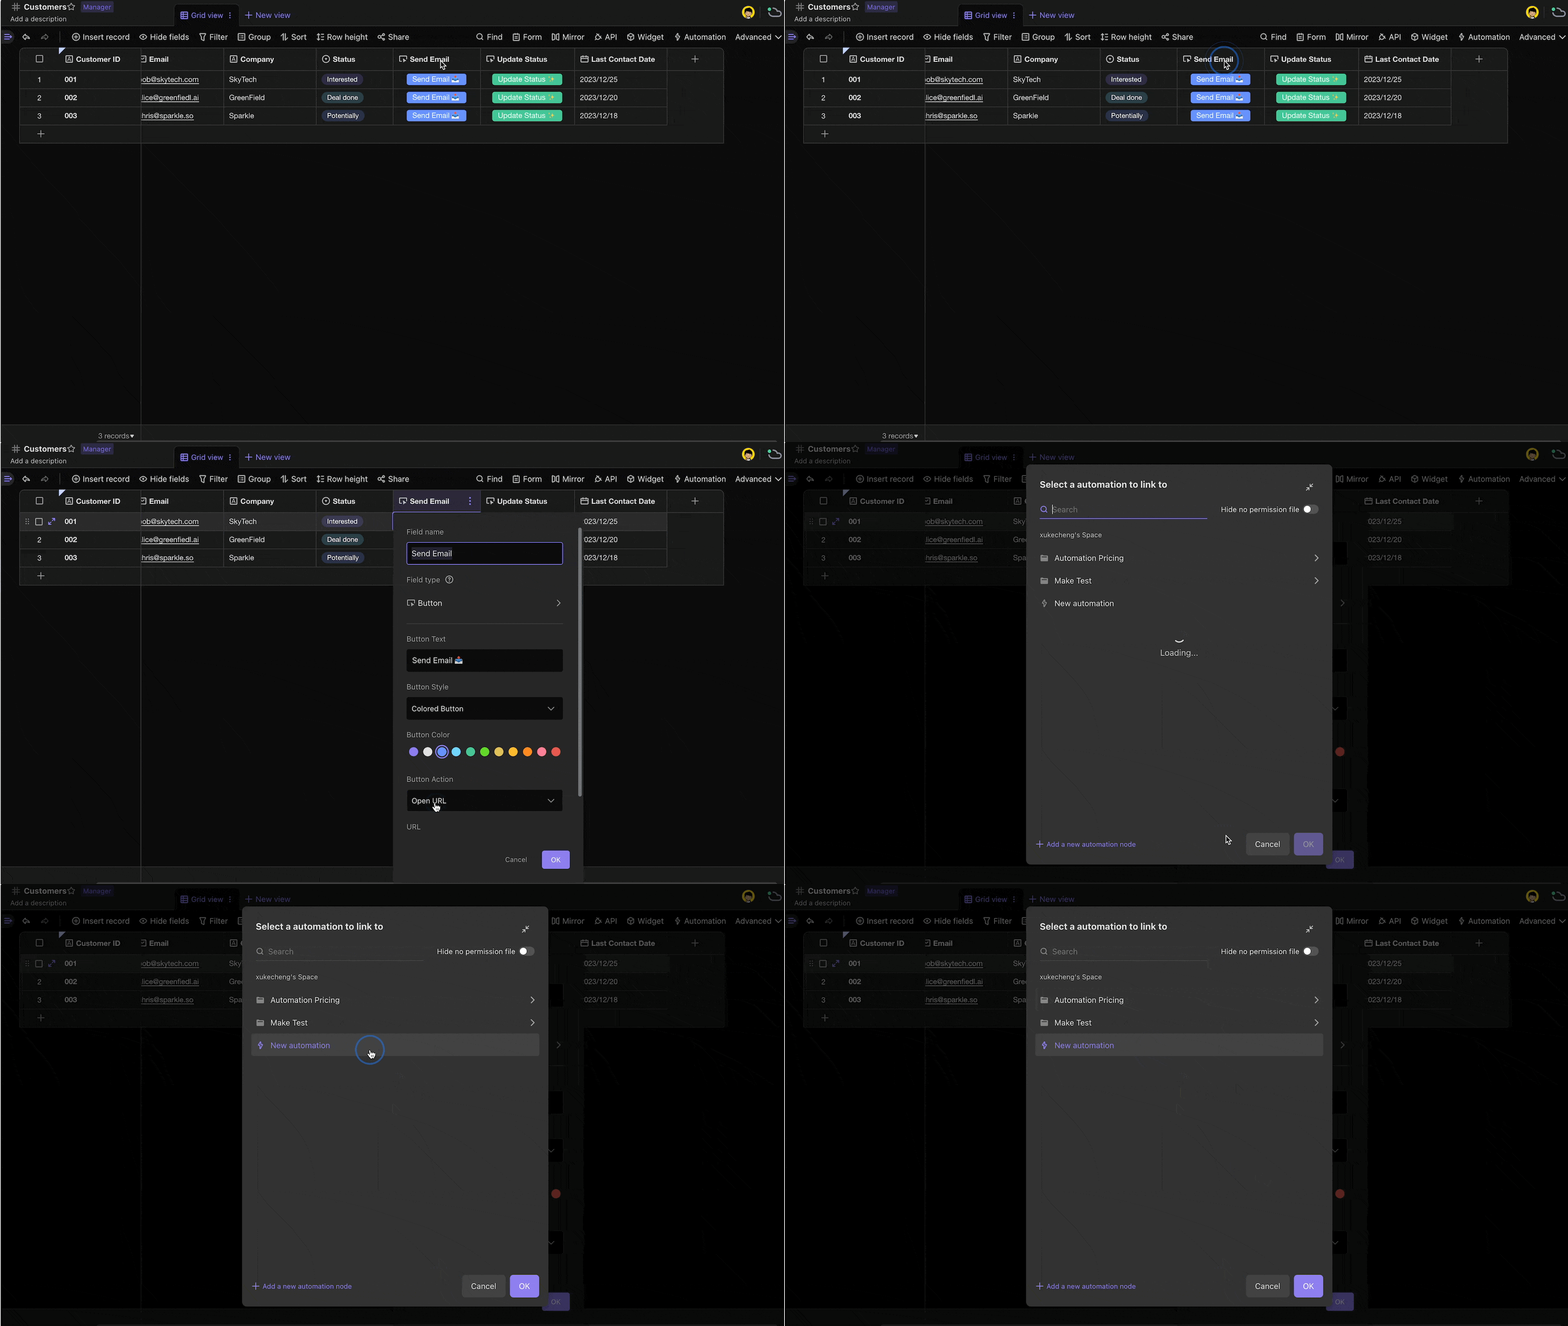
If selecting an existing node, a trigger condition bound to the Button Field is created within that node. If creating a new node, you will be redirected to set up the trigger condition as "Button is Clicked", thereby initiating the automation process upon clicking.
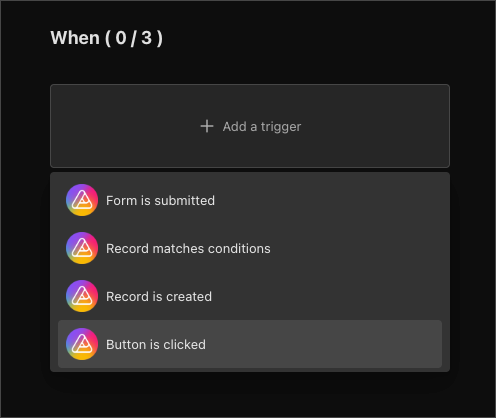
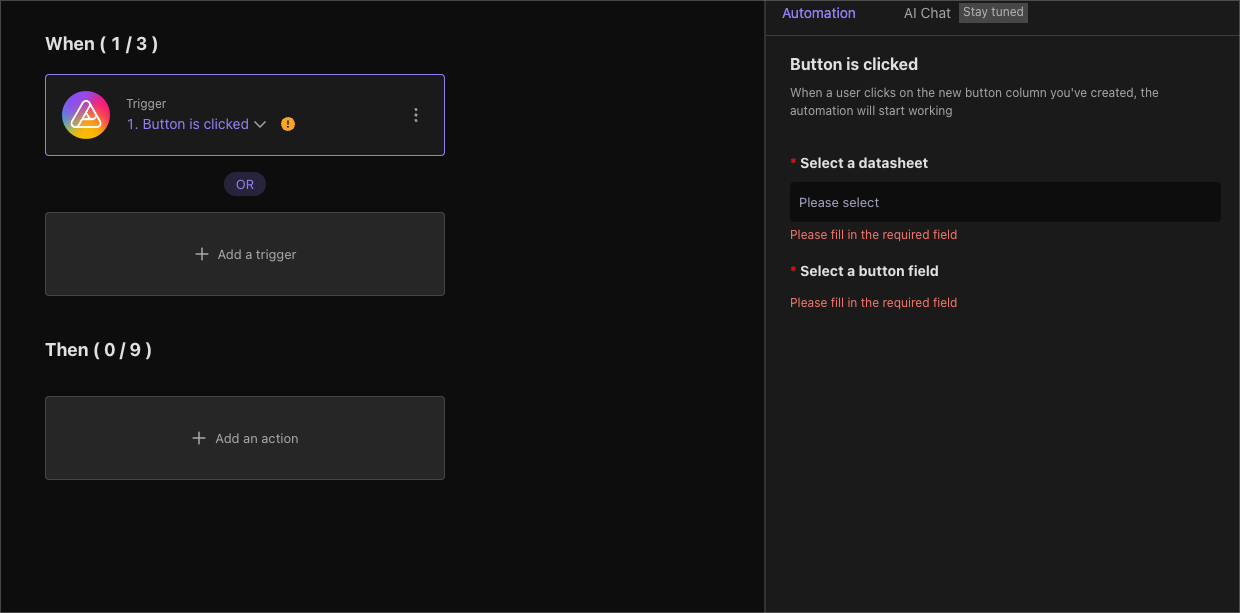 Expanded Reading
For detailed information on configuring automation nodes, please refer to the Automation Section.
Tips for use
Open the form and pre-fill the form content
URL Using the Smart Formulas schema, you can interoperate with the How to Implement Form Pre-fill capability to enable more flexible business-customized form-filling scenarios.
Below is a common scenario for a customer management system, filling out a customer visit record:
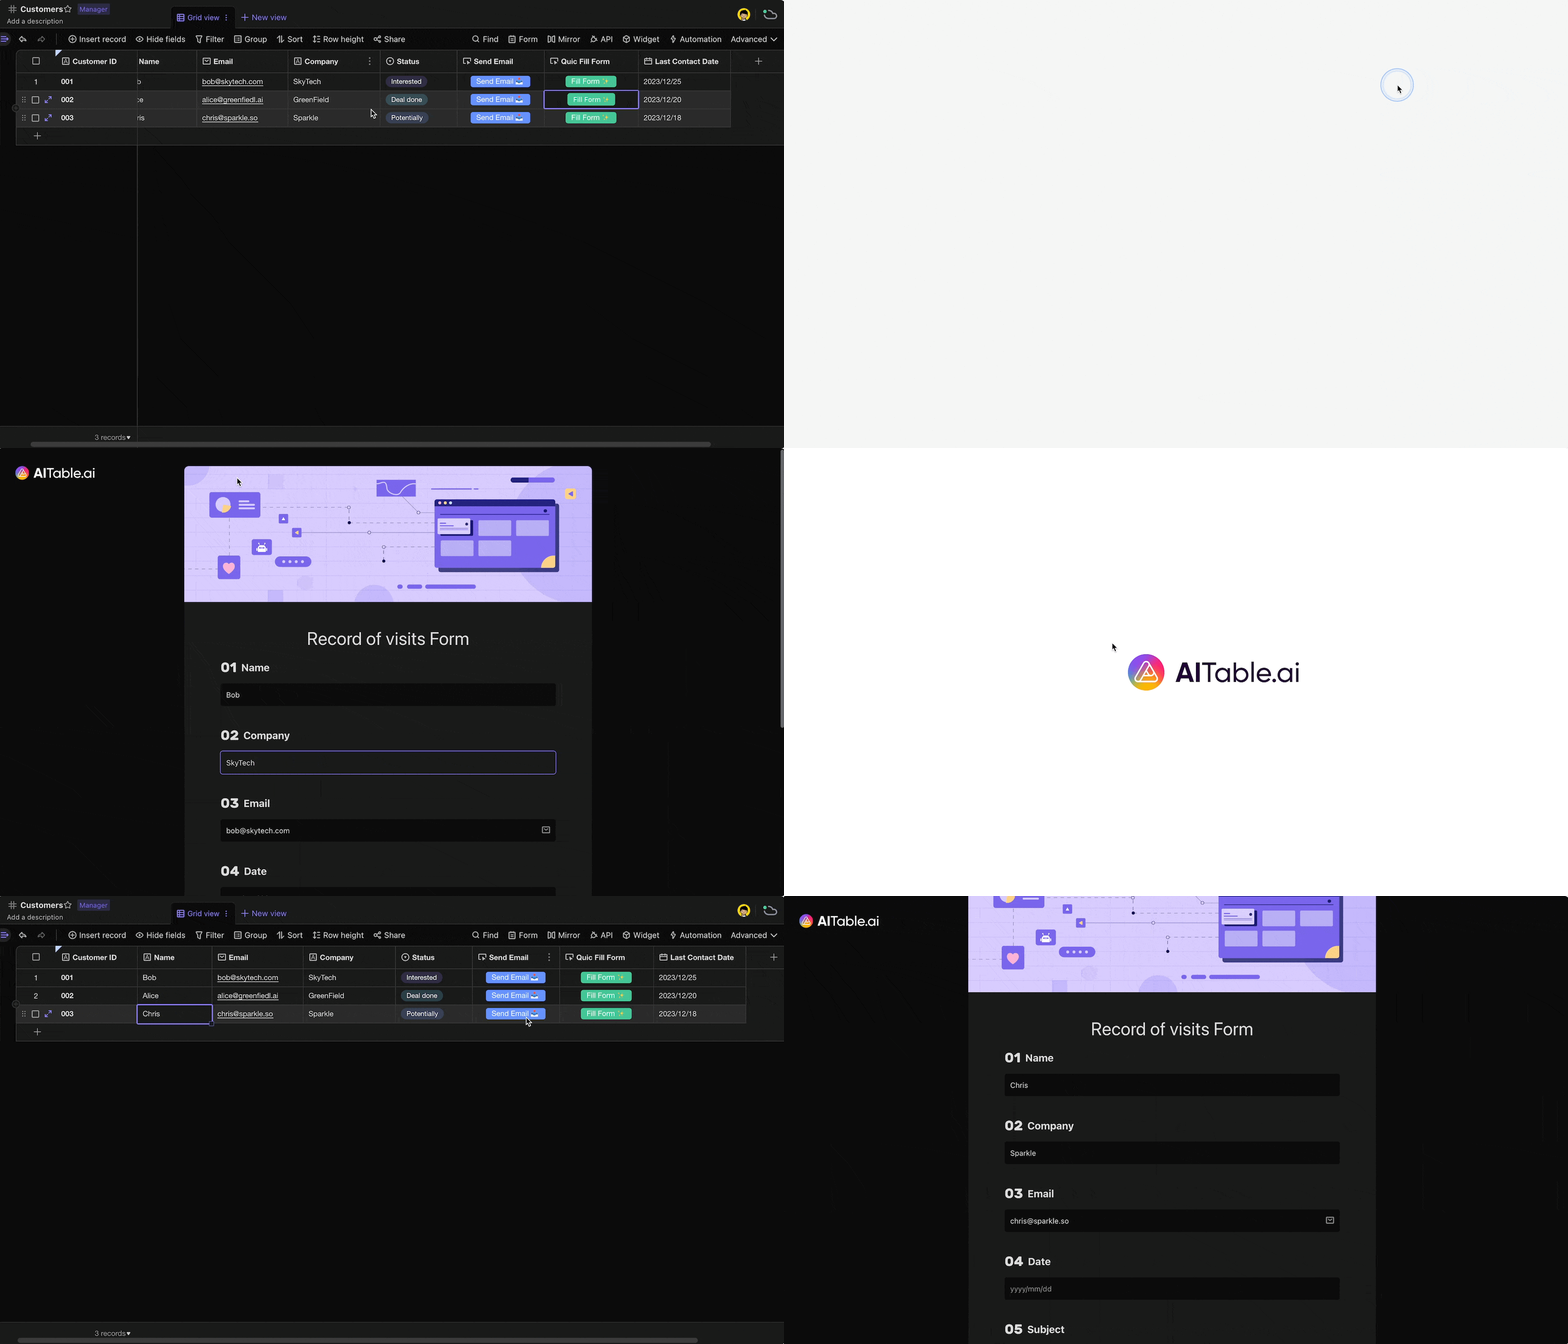
In the above example, after a sales colleague has visited customer "Bob", he can directly click the button "Quick Fill Form" in the customer contact form to open a pre-fill form with the customer's name, e-mail address, company name, date, etc., so as to efficiently and accurately fill in this customer visit record. name, so that you can efficiently and accurately fill in the customer visit record.
The example uses the formula below to stitch together a form link with pre-fill parameters and uses the date function DATETIME_FORMAT(TODAY(), "YYYY-MM-DD") to dynamically fill in the day:
"https://aitable.ai/share/shrxxxxx?fldlESqbu9Bhg=" & {Name} & "&flddlheNRp7qR=" & {Company} & "&fld4MMa8Nvaj1=" & {Email} & "&fldnQMMZAb06C=" & DATETIME_FORMAT(TODAY(), "YYYY-MM-DD")
In addition to client visits, there are more practice Scenarios for you to consider:
- Customer feedback collection
Scenario: the customer service team needs to collect customer feedback on a product or service.
Practice: In the customer database, set up a button for each customer record with a link to a feedback form that is pre-filled with the customer's information (e.g., name, email, product purchased, etc.). When a customer service representative communicates with a customer, he or she can open the form link directly through the button and quickly record the customer's opinion on the product or service, improving the efficiency and accuracy of feedback collection.
- Order Processing
Scenario: The e-commerce platform needs to process orders, including order confirmation and logistics updates.
Practice: Set a button for each order record that links to a form with pre-filled order details (e.g. order number, purchased item, shipping address, etc.). This allows the relevant department to quickly access and update order information when processing returns, exchanges, or customer inquiries.
- Employee Information Update
Scenario: HR department needs employees to update their personal information on a regular basis.
Practice: An employee list form has a button for each employee that links to a personal information update form that is pre-filled with the employee's basic information (e.g. name, department, position, etc.). Employees can quickly access and update their information by clicking on the link, reducing the workload of the HR department.
- Customized marketing campaign
Scenario: The marketing team wants to send customized product recommendations to customers.
Practice: Buttons are set up in the customer database to link to marketing forms that are pre-filled with information about the customer's interests and preferences. In this way, personalized product recommendations can be sent to increase customer engagement and probability of purchase.
These scenarios demonstrate how you can streamline and optimize the data collection and processing process by combining button columns with smart formulas and form pre-fill functionality to improve efficiency and user experience.
Open your email client and pre-populate the email content
The URL input box allows you to enter web addresses starting with http(s)://, and also supports a number of common browser URL protocols, including mailto:.
This is a way to send e-mail in your browser. When you type mailto:example@email.com into your browser's address bar and hit enter or visit, it opens the default mail client and automatically populates the recipient's address as example@email.com.
This schema can be used to create an email link with pre-filled recipients, cc's, subject and body. For example, you can use something like the following to create an email link with pre-filled information:
"mailto:" & {Email} & "?subject=" & {Name} & ", welcome to use AITabke! &body=Hi," & {Name} & "<br>The content of this email is generated by pre-fill the button fields!"
Demo:
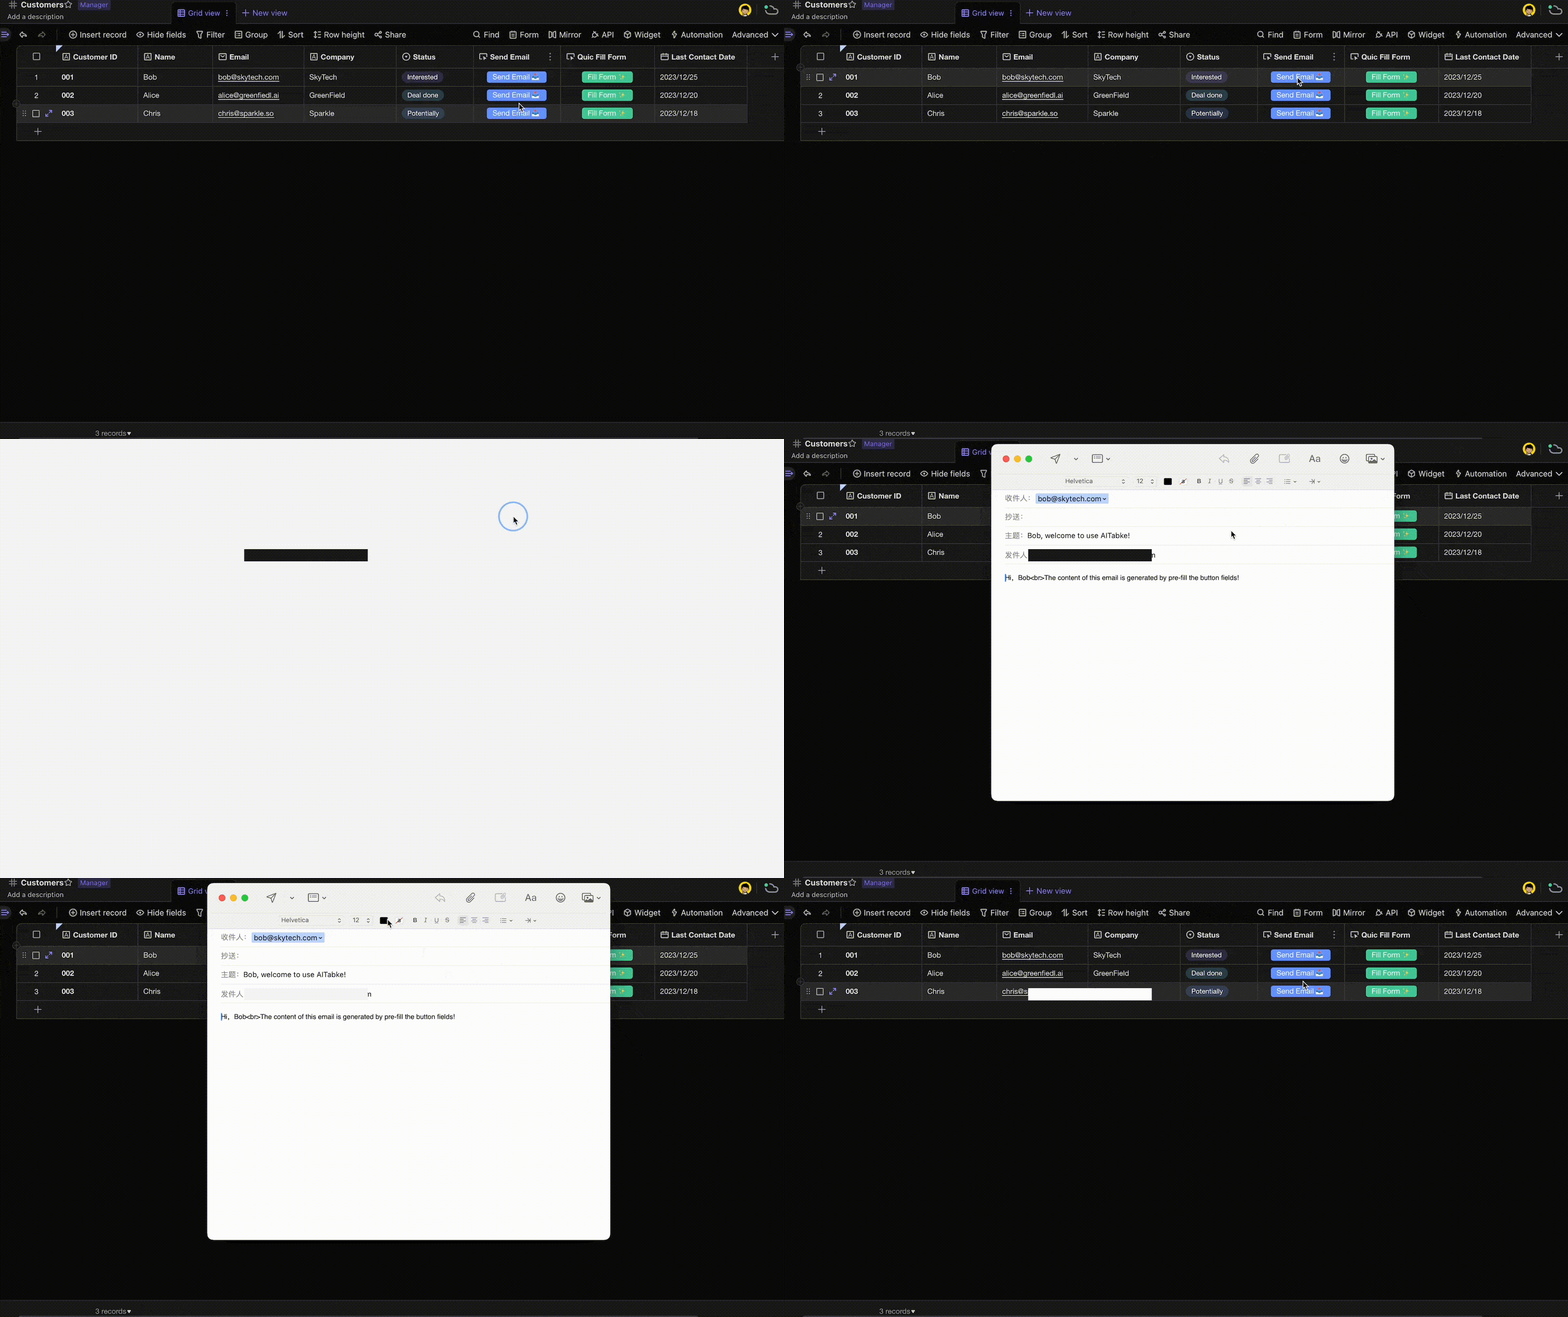
- Please note that the behavior of specific mail clients may vary depending on the operating system and user's default settings. In some cases, the user may need to manually select or confirm which mail client to use to handle the link.
- More grammatical instructions on the
mailto:protocol header can be found on the Internet, so I will not introduce them one by one here.
Open the SMS editing interface on mobile and pre-populate the content
AITable is a cross-terminal tool that allows you to use the convenience of button columns on your cell phone through your browser. For example, clicking on a button brings up the dialing panel of your phone and pre-populates it with a cell phone number (via the tel:' protocol header, e.g. tel:+65 1234 5678`).
You can also bring up your phone's SMS editing panel with a click of a button and pre-fill it with recipients and SMS content:
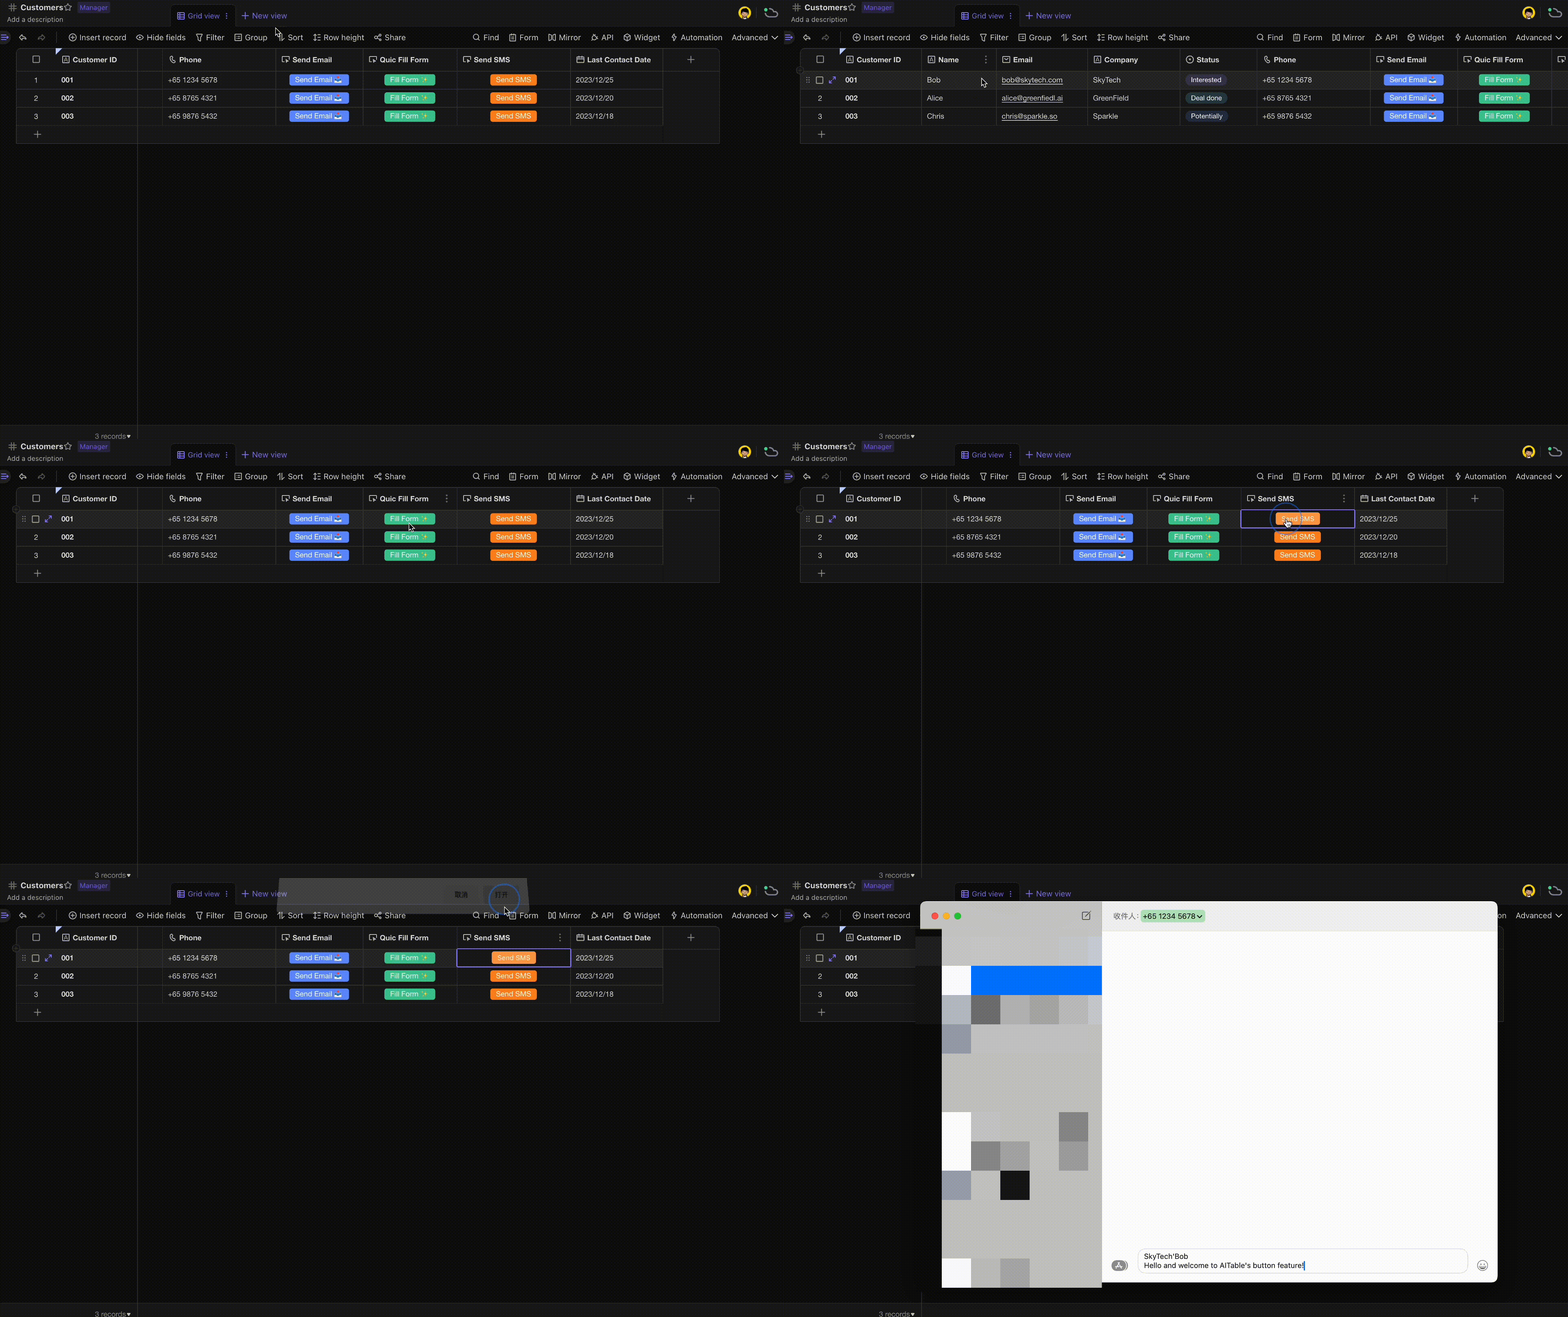
The above example fills in the URL input box of the button with the following formula:
"sms:" & {Phone} & "&body=" & {Company} & "'" & {Name} & "%0aHello and welcome to AITable's button feature!"
Note that support for the sms: protocol header may vary between mobile devices and operating systems, and the exact behavior may vary from device to device and operating system to operating system.
FAQ
1. Why is the button click not working or showing failure?
Please check if the automation node is active and the actions are correctly configured. You can also review the automation run history for detailed failure reasons.
2. Does deleting a Button Field remove the linked automation node?
No, deleting a Button Field does not delete the associated automation node. The node must be deleted separately in the automation management page.
3. Can a Button Field be configured to trigger multiple automation nodes?
Currently, a Button Field can only trigger all actions under one automation node. If you need to trigger multiple different automations, consider creating multiple Button Fields.